The Christmas tree decorations They are one of the most popular crafts on these dates. In this post I am going to teach you how to do 2 VERY ORIGINAL IDEAS to do at home with the little ones. They're going to have a blast And your tree will look absolutely beautiful decorated. Plus, you'll find many more ideas inspired by activities that are a hit in other homes, so your Christmas decorating can become a... a creative, educational and very entertaining family plan.
Materials to make Christmas decorations

Before we begin, it's important to have all the materials ready. These are materials easy to find, economical and perfect for working with children while they develop their fine motor, hand-eye coordination and their imagination.
- Colored eva rubber
- Scissors
- Glue or cold silicone
- Buttons
- Pipe cleaner
- Permanent markers
- Eva rubber punches
- Thread or cord
- Mobile eyes
- Star shaped cookie cutters
To these materials you can add, if you want to be inspired by other ideas that are very popular among families and schools:
- Colour cardboard to create cards, paper trees or decorative backgrounds.
- Felt fabric in various shades to make soft and durable figures for children.
- Rolls of toilet paper or clean kitchen items, ideal for recycling and making reindeer, Santa Claus or small decorative candle holders (always with an LED candle).
- Natural pineapples collected on a walk, perfect for transforming into mini Christmas trees or characters.
- Glass jars (from yogurt or preserves) to create lanterns or snowy jars.
- wooden beads or large plastic ones for stringing together to form stars, garlands or little angels.
- Cotton balls to simulate snow or to fill paper snowmen.
- Silk paper and recycled wrapping paper to make garlands, wreaths and decorative details.
Remember that, especially with young children, it's important that the materials are paymentswithout excessively small parts to avoid risks, and use children's scissors round-toed shoes adapted to their age.
Process for making Christmas decorations

Gingerbread man
These gingerbread men They're perfect for decorating the tree or any craft project, as they look so cute and colorful. They'll be the perfect finishing touch. tree full of life in a house where there are children, and they can also be used to decorate doors, windows, greeting cards or even as Christmas bookmarks.
Besides being beautiful, this type of craft helps children develop their fine motor skills. creativityThe marker stroke, the notion of symmetry and patience, since there are several linked steps that will be completed.
And now, we are going to see the step by step of this project.
- To begin with, Cut out these pieces from brown EVA foamYou can choose the size to your liking, as it will depend on the dimensions of your tree or the object you want to decorate.
- Glue the head above the trunk and then the arms, on the sides of the body.
- Place on the head the wavy piece that will imitate the frosting that carries our doll on his head.
- Now place your eyes mobiles in the face very carefully so that they are aligned.
- With permanent marker, draw the details of the face as eyelashes and nose.
- Make two small circles with the pink eva rubber hole punch that will be the blushes.
- Then draw a smile with red marker.
- Stick on the doll's belly two buttons or whatever you have at home such as stones, pearls, etc.
We make the details of the gingerbread man
- With a red circle and a thin strip of eva rubber we are going to form the cherry that we will place on the head of our character.
- I will use a white marker to make the Details on the arms and legs with a zigzag patternYou can also use white paint.
- To form the sugar stick I'm going to shape the pipe cleaner and trim the desired size.
- With many colors I'm going to make a kind of confetti in frosting making little dots and I'm going to give the icing a shine.
- Now, I will place the sugar stick in one of the doll's hands.
- To hang it, you need to make it a hole in the head and put a thread on it, cord or similar.
And we already have our finished gingerbread man. You can make several versionsI also made the little doll and it turned out very well too.
If you want to expand on this idea and get even more out of the gingerbread man design, you can:
- Create gingerbread man garland joining them with a cord to decorate windows or the top of the tree.
- Use them as site markers at the Christmas table, writing the name of each guest on the doll's belly.
- Turn them into magnets by sticking a small strip of adhesive magnet to the back and placing them on the refrigerator.
- Prepare a small workshop with several models: with a scarf, with a hat, with a bow, with a bow tie… so that each child can personalize their own.
Stars to decorate your tree

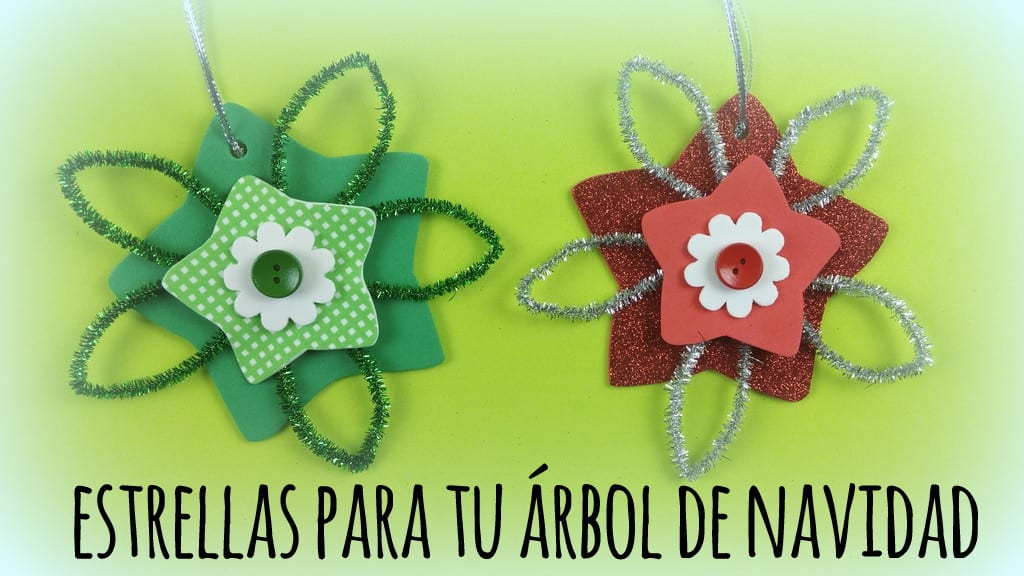
These stars are perfect to give you a touch of light to our Christmas treeThey are very easy to make and you can create them in a thousand different colors and sizes. Furthermore, they allow children to practice cutting, using glue, and design. symmetrical compositions, something very positive for their visual and creative development.

Step by step
- To get started, you need star shaped cookie cutters in two different sizes. If you don't have one, you can replace them with templates downloaded from the internet.
- Mark the silhouette in the eva rubber and cut them out. To make them more beautiful, use two different designs.

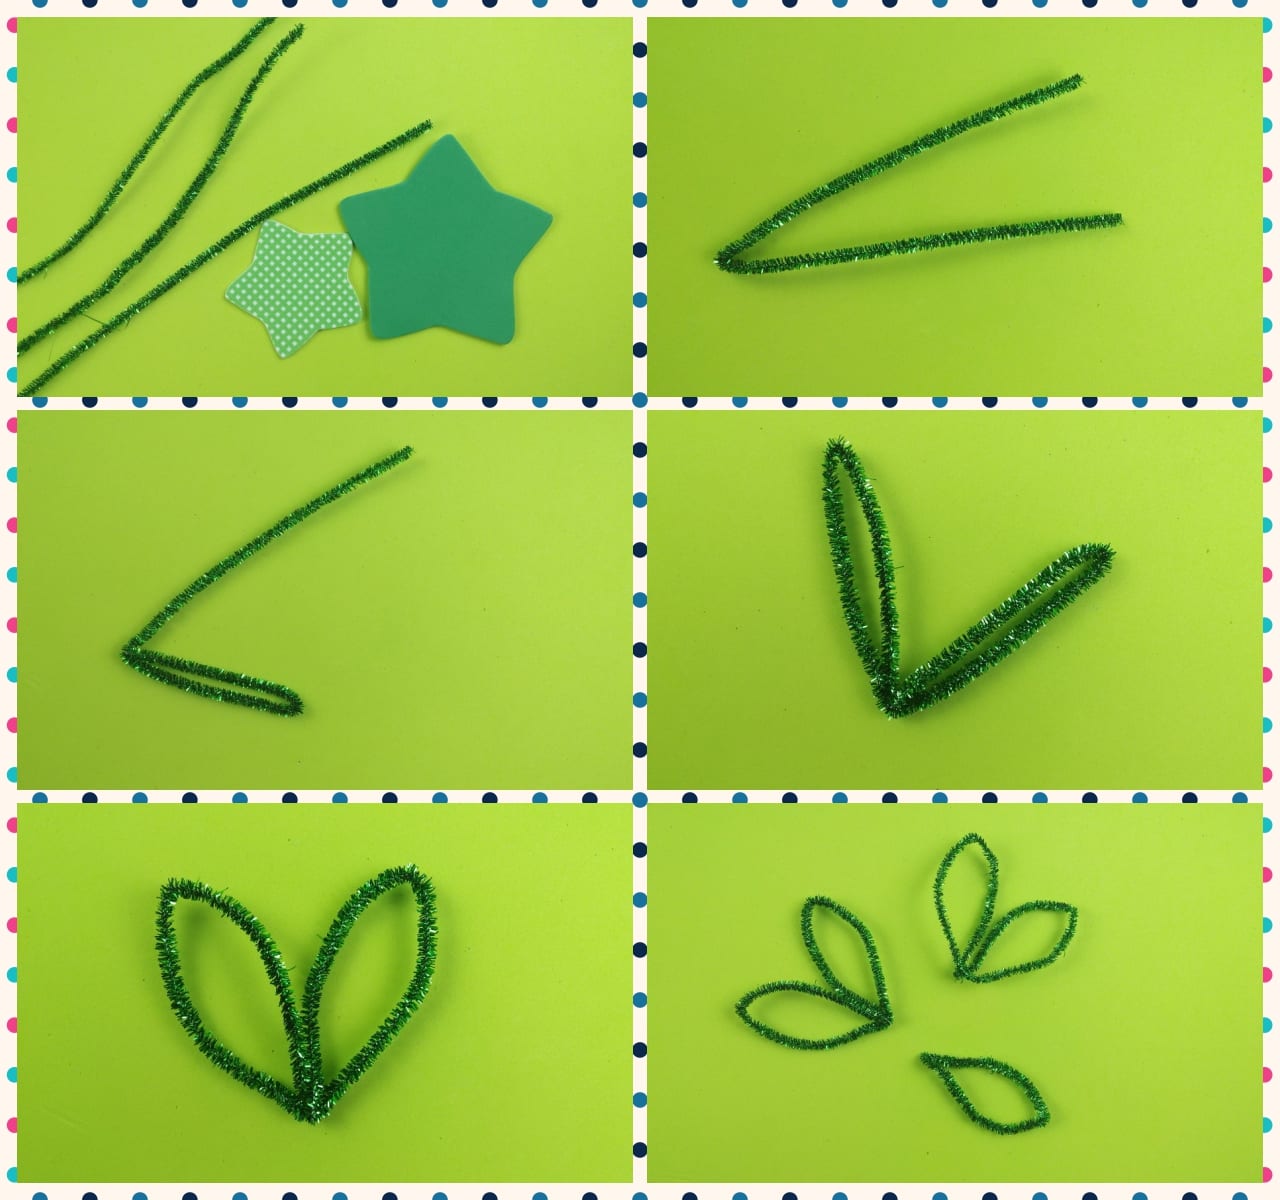
- Now we are going to form the petals with the pipe cleaner.
- Fold in half this material and then, brings one of the ends towards the centerDo the same on the other side and we will have two petals left.
- With the help of your fingers, open them until they are as in the image.
- We will need 5 petals in total, so you should use 2 whole pipe cleaners and half of another.
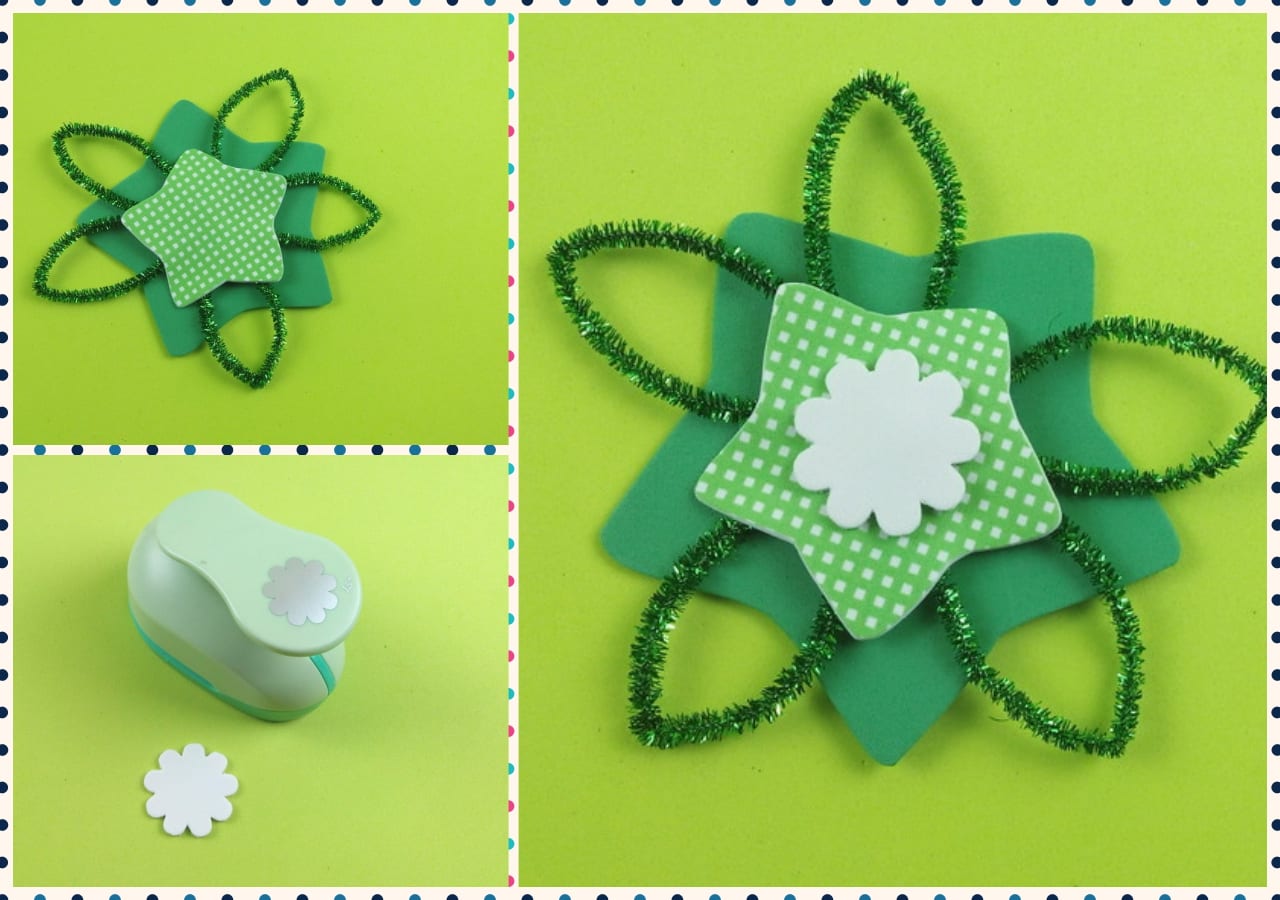
- With the hole punch circles, make one out of EVA foam and Stick it in the center of the big star.
- Then gradually stick the pipe cleaner petals as you see in the photographs so that they are well centered.
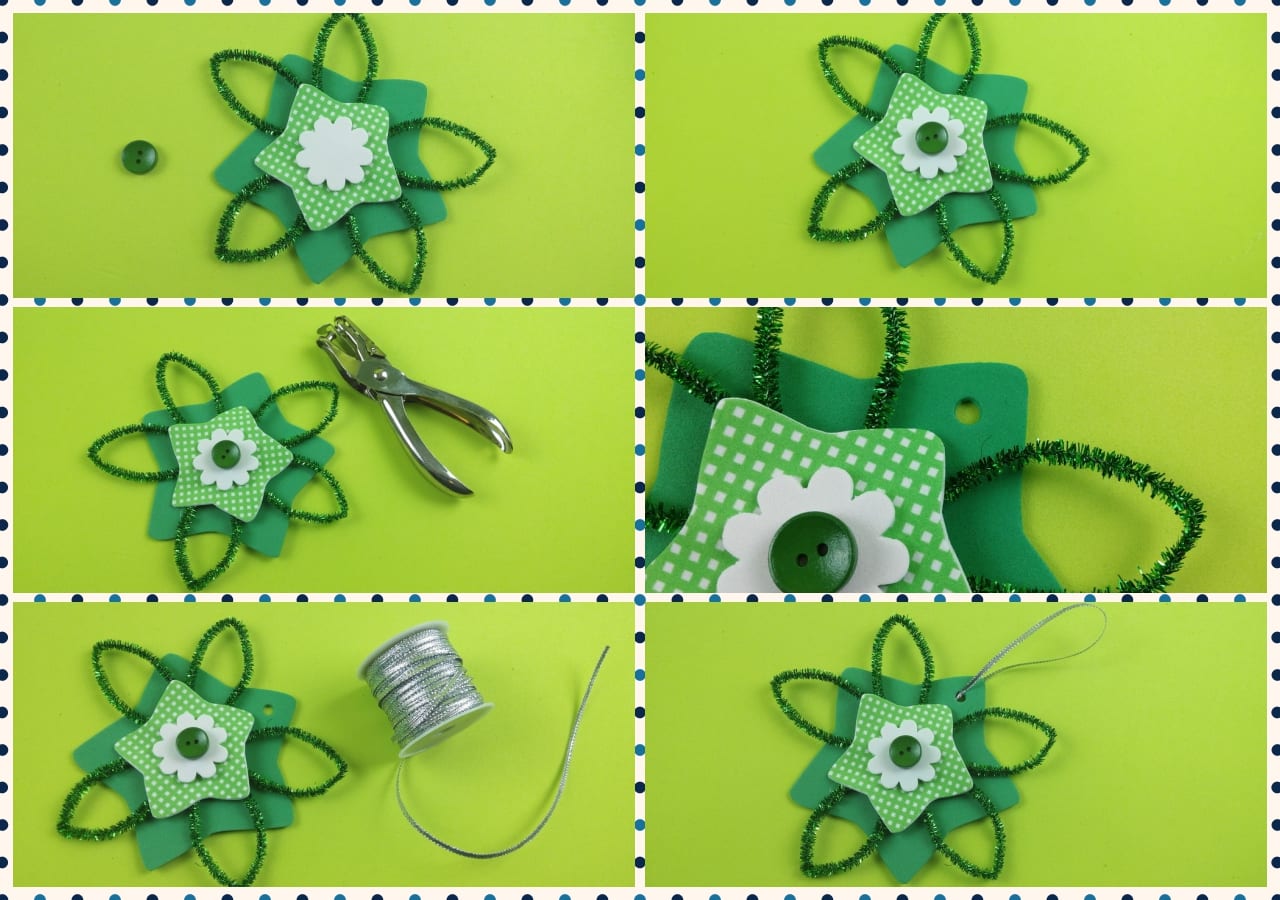
- Once we have the 5 petals, we will place the small star on top.

- With the hole punch I'm going to do a flower and I am going to place it in the center of our project.
- We're almost finished, we just need to... attach a button to decorate the center of our Christmas star.
- To hang it, we will need to make it cut a hole and put a cord or string through it..

And we have finished our star to decorate our tree. It is a very easy job and they are great to do with someone at home in your free time.
You can combine colors and designs to create many possibilities.
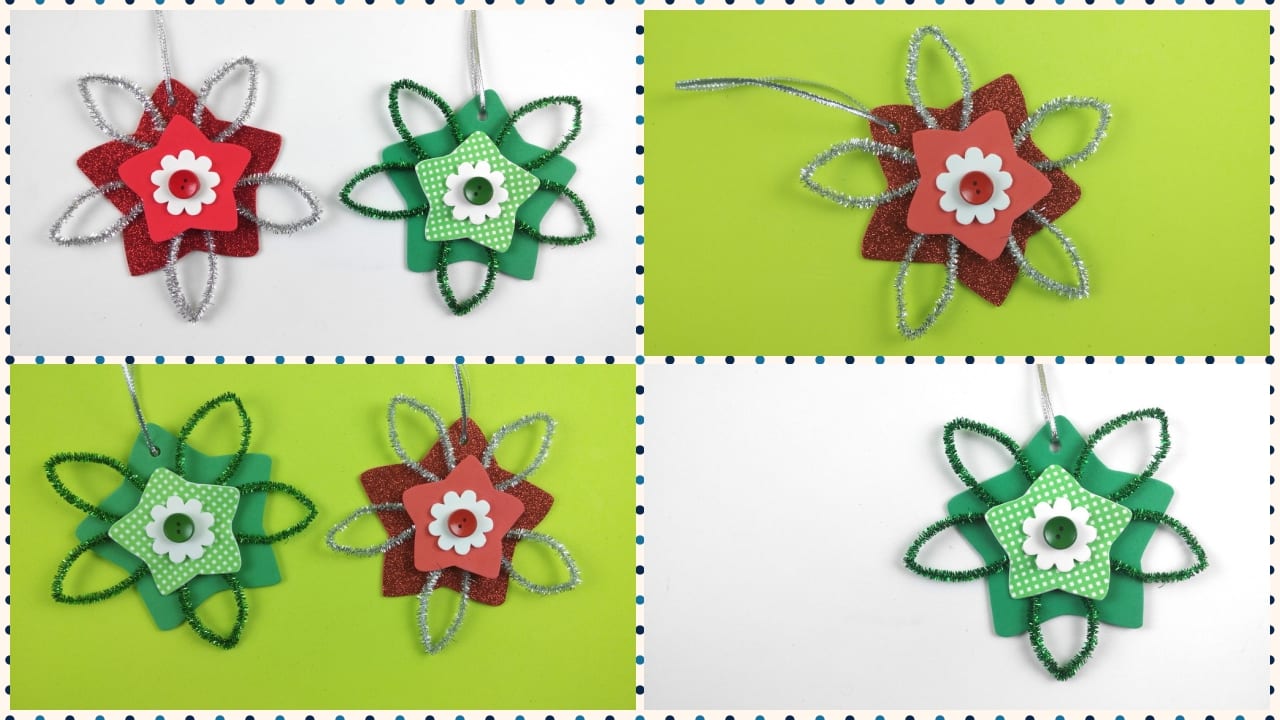
Some additional ideas for using this pipe cleaner star design could be:
- Create star garland joining several with a long cord for the living room, the headboard of the bed or the window.
- Make them in mini size for use as decorations on gift packages or Christmas cards.
- Use cardboard or paper instead of EVA foam, following the same pattern, to make flatter projects, ideal for sticking on windows or walls.
- Turn them into centerpieces, gluing each star onto a hard cardboard or wooden base, and decorating around it with pinecones, branches or LED candles.
More Christmas decoration ideas to make with children
If you're still eager to create, here's a selection of easy Christmas crafts Inspired by activities that work best in homes, schools, and children's workshops, all are designed to help children develop their creativity, self-esteem and manual skills while they decorate the house and prepare small gifts.
Snowmen made with juice cartons
A very simple craft, perfect for recycling. Kids transform empty containers into cute creations. snowmen that can decorate shelves or tables.
Materials:
- Clean and dry juice, milk or smoothie cartons.
- White cardstock for covering.
- Ribbons or bows of different colors.
- Colored buttons.
- Glue, adhesive or double-sided tape.
- Black marker.
- Orange paper or paint for the nose.
The children cover the carton with white cardboard, draw a snowman face Using a black marker, they add an orange nose made of paper or paint and glue on three buttons in a row. With a ribbon around the neck, they create a scarf Very eye-catching. It's an ideal craft for working on recycling and... facial expression (happy faces, surprised faces, sleepy faces…).
Snowy pots with glass jars
Glass jars become delicate snowy boats perfect for placing on windows or shelves.
All you need are clean jars, white glue or varnish. white glitter or fine salt to simulate snow and some decorative ribbons. Coat the outside of the jar with a thin layer of glue and sprinkle glitter or salt on top. When dry, the effect is like frosted glass. You can finish with a bow on top and, if you like, place an LED candle inside to create a warm and safe environment.
Homemade Christmas tree decorations
Besides gingerbread men and stars, it's very easy to create other decorations using polystyrene ballscardboard or felt.
- Polystyrene balls can paint with temperaCover with colored wool, line with fabric or wrap with yarn and glue on buttons or beads.
- Children can cut out shapes using felt or cardboard trees, reindeer, snowflakes, hearts or bells, decorate them and hang them with a string.
- If you create simple templates, the little ones will only have to review and cutSomething perfect for different ages.
Christmas figures made of clay or plasticine
For children who love modeling, the figures of modeling clay or modeling paste They're a great option. You can create trees, candy canes, snowmen, reindeer, or even a small Plasticine Nativity Scene.
This activity works on the fine motorFinger strength and concentration are key. If you use air-dry clay, you can keep the figures as souvenirs and use them for decoration year after year.
Popsicle stick crafts
If you've been saving clean popsicle sticks, you can transform them into Christmas trees, sleighs, little houses or starsThe children paint them with tempera, watercolors or markers and then glue them together forming different figures.
With three sticks forming a triangle and some buttons or pom-poms you can make a very striking treeYou can also create Christmas photo frames or small name plaques to hang on their bedroom door.
Christmas wreaths made with paper plates
Wreaths are a classic Christmas decoration and can be easily made with children using paper or cardboard plates.
The center of the plate is cut out to leave only a ring, it's painted green, and decorated with small balls of red tissue paper, ribbons, drawings, or pom-poms. Finally, a large bow is added to the top and a small cord for hanging it on the door. It's a perfect activity for practicing... painted, the crumpled paper and the color combination.
Reindeer and other characters with toilet paper rolls
Cardboard rolls allow manufacturing reindeer, Santa Claus, angels or elvesFor a cute reindeer, paint the roll brown, add cardboard antlers, eyes (drawn or googly), and a red pom-pom for a nose. It's an inexpensive, sustainable, and very appealing craft for ages 4-5 and up.
Garlands with pipe cleaners
You've already seen how to use pipe cleaners on the star, but you can also transform them into flexible garlandsSimply close each pipe cleaner into a loop and link them together. Choose typical Christmas colors (red, green, gold, silver) and you'll have a lightweight, safe, and perfect decoration. trees, shelves or headboards.
Christmas cards and greetings
Handmade cards make a precious keepsake. With colored cardstock, felt, buttons, and the help of the little ones, you can design them. personalized congratulations with trees, bells, reindeer, stars, or little angels. It's a fantastic way to work on the written message, the affection towards the family and the joy of giving something made by themselves.
Safe Christmas lanterns and lights
Using decorative paper, stamps, markers, and glass or cardboard jars, children can create Christmas lanterns that bring a magical atmosphere to the home. It's important to always use them. Battery-operated LED candlesNever use real candles, as paper and plastic are flammable materials. This activity is ideal for slightly older children who enjoy projects with more steps and details.
Paper Christmas tree ornament
In this video you can see the step by step of how to make this beautiful paper ornament for your treeIt's a great idea for working with paper, folding and gluing, and thus continuing to expand your repertoire of home decorations that children can create almost entirely on their own with very little help.
Mini Christmas tree made of paper
If you have space problems at home to be able to place a large tree, do not worry, I will leave you this miniature tree, made of paper and with a spectacular result.
It's perfect for children to decorate their room, their desk, or even to take to school as Christmas giftIt's also a fantastic idea for group work, where each child can make their own mini tree.
I hope you liked these ideas, and if you try any of them, don't forget to send me a photo through any of my social media channels. Turning the preparation of Christmas decorations into a family ritual helps the little ones feel involved. protagonists of the decorationstrengthen their autonomy and experience these dates as something even more magical and special.